THE SMART PRECISION

ECO-EFFICIENT
BECAUSE SUSTAINABLE

Efficient and cost-effective control
through nondestructive measurement

NEW MIT-DOWEL-SCAN
DETERMINATION OF DOWEL AND TIE BAR POSITIONS IN CONCRETE SURFACES

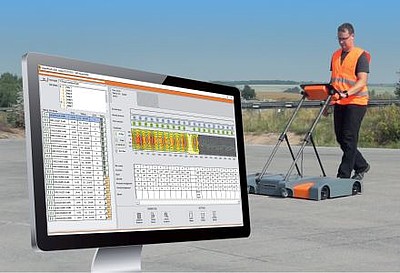
MIT-DOWEL-SCAN belongs to the recent generation of devices for the non-destructive determination of dowel and tie bar positions in plain concrete. It comes with a new handling concept allowing the operator to measure and evaluate in real-time without using a rail system. The device makes use of the magnetic properties of the dowel bar by recording its returned magnetic field via an array of sensors.

New features include:

  • Without a rail system, the MIT-DOWEL-SCAN completes testing quicker thean the previous MIT-SCAN2-BT system.
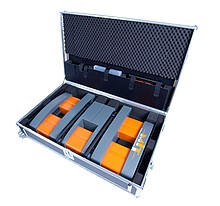
  • The entire unit is provided in a single transport case making it easier to move.
  • The new MIT-DOWEL-SCAN has ten sensors and a laser to guide the unit along the joint with great accuracy and repeatability.
  • Single person operation with integrated data collector held by the scanning device.
  • Easier transfer to MagnoProof 5 with USB port on the data collector.


The measurement device is used for Quality Control, Self-Monitoring and Quality Assurance for acceptance during construction. Details are shown in ASTM E3013/E3013M and various national standards worldwide. The MIT-DOWEL-SCAN technology is required by many state DOTs in the US when dowel bars are inserted with a DBI.

The measurement and evaluation of dowel bar positions in a joint take less than a minute. Dowel embedment depths, misalignments & translations are determined precisely for inserted dowels. If dowel bars are implemented in baskets, the measuring method provides useful information about the presence as well as significant translations and/or distortions of the baskets.

The device is applied in:

  • Concrete road construction (highways)
  • Airport runway constructions
  • Habor container areas


   TEST NON-DESTRUCTIVELY - ELEMINATE CORING - INCREASE QUALITY - DECREASE COSTS


  • BENEFITS

  • COMPARISON

  • SPECIFICATIONS

  • ACCESSORIES

  • Software

  • Downloads

Verfahren schnell & effizient

RAPID & EFFICIENT

  • Comfortable new handling configuration
  • Fast & easy to assembly and disassembly for transport
  • Clearly arranged display panel for easy operation
  • Intuitive measuring procedure
  • Calculation of dowel bar positions immediately after the measurement
  • Measurement of a joint across several lanes within one minute
  • Evaluation of a huge number of joints per day

Verfahren Wirtschaftlichkeit

COST-EFFECTIVE

  • Increase quality
  • Reduce costs
  • Efficient measurement method with high daily output
  • In-process paving adjustments of the DBI
  • Automatic evaluation of data

Verfahren zerstörungsfrei

NON-DESTRUCTIVE

  • Signal recording by simply moving the device over the concrete pavement
  • No core extraction required

Verfahren Präzision

PRECISE

  • Accurate measurement of dowel and tie bar positions in concrete
  • Precise determination of dowel embedment depth, misalignments & translations
  • Objective & repeatable

Verfahren flexibel

FLEXIBLE

  • Measuring independently of the degree of cure
  • Measuring before and immediately after the cutting of the joint
  • Measuring even on wet pavement
  • Measuring also on fresh concrete, as soon as a person can walk on it

Verfahren nachhaltig

SUSTAINABLE

  • No core required
  • Free of emissions
  • Safe to humans, nature and environment

To top

The non-destructive electromagnetic determination of dowel and tie bar positions in concrete is using the puls induction measuring method, a further development of the eddy current method. It enables the operator to carry out precise, rapid and very effective measurements in the field.

Especially when compared to the likewise non-destructive electromagnetic method that uses refelction (GPR=ground penetrating radar), the pulse induction method implemented in the MIT-DOWEL-SCAN offers key advantages. Noteworthy are in particular its high measurement speed, simple and intuitive handling and enormous versatility. While GPR can´t be used on roads during wet weather, the MIT-DOWEL-SCAN delivers precise and reliable measurements even on roads that are rain-drenched. Measurement can even be taken on fresh concrete as soon as it can be walked on by the staff. In practice, the GPR system also relies on frequent core extractions, i.e. before starting the measurement or when deviations occur of the concrete´s properties on the measurement site. The dowel position measuring device MIT-DOWEL-SCAN, on the other hand, only requires an initial calibration of the type of dowel or tie bar used.

The MIT-DOWEL-SCAN also excels from the economical perspective: It enables users, for example, to determine the exact positions of dowel and tie bars on-site within a minute. GPR, by contrast, requires time-consuming evaluation at the office workplace.

The speed of the dowel position measurement device, therefore, not only enables large areas or road stretches to be inspected per workday, but also allows adjustments to be made during the paving process, e.g. changing the dowel inserter settings. Thes advantages together with the compact design, ease of use and versatility of the MIT-DOWEL-SCAN translate into substantially lower costs per test.

  • Simple & intuitive operation
  • Rapid & effective measuring
  • Flexible use (even on wet surfaces and green concrete)
  • Automatic evaluation of huge numbers of data

MIT-DOWEL-SCAN is recommanded due to its compact version and comfortable handling to all who are coping with quality control within the pavement industry.

       NON-DESTRCUTIVE TESTING - ELIMINATE CORING - INCREASE QUALITY - DECREASE COSTS


To top

Scope of validity

The depth range is based on the projected standard depths and on the corresponding calibration range. In the standard case, the tolerance specifications typically apply to depths between 110 mm and 190 mm. These tolerances are valid over a sufficiently wide range around standard bar positions. 

Side shift
Translation
                             maximum 80 mm
Horizontal skewmaximum 40 mm
Vertical tiltmaximum 40 mm

Tolerances

The indicated tolerance values apply within the valid range mentioned above and in the absence of influence from foreign objects.

Repeatability4 mm
Path measurement in direction
of joint
3 mm ± 0.3%
Absolute depth4 mm
Side shift8 mm
Horizontal skew4 mm
Vertical tilt4 mm

Temperatures

Operation temperature                 -5 °C to 50 °C
Storage temperature  -10 °C to 50 °C

Measuring device

Dimensions                                  116 cm x 74 cm x 17 cm
Weight25 kg
BatteryLithium-ion battery pack 14.8 V / 6.8 Ah / 100 Wh 
Operation timeapprox. 8 h
Charging timeapprox. 4 h

Scope of delivery

MIT-DOWEL-SCAN is delivered as a complete system ready to use. The measuring vehicle is equipped with an operating unit, a laser unit, the software package MagnoProof 5, manuals and a solid case. Calibrations are additional and sold per dowel & tie bar sizes. Training is available upon request.  

Dimension of the case                     138 cm x 90 cm x 32 cm
Gross system weight 65 kg
 

To top

MIT-dowel-SCAN

Seitenansicht MIT-DOWEL-SCAN

Spare parts on demand
Charger, spare part battery, mechanical components like wheels, axles and other wearing parts...


Gerätekoffer MIT-DOWEL-SCAN

Case MIT-DOWEL-SCAN
Solid case for storing the system and equipment as well as for safe transport

Our new MIT-MagnoProof 6 analysis software is part of the delivery of MIT-DOWEL-SCAN. The main function is the evaluation of measurement data at the desktop PC. MIT-MagnoProof 6 functions at a glance:

  1. Simple data transfer to a desktop PC via USB
  2. Effective data organization
  3. Convenient correction of erroneous data
  4. Easy check of interferences
  5. Automatic evaluation of dowel bar positions
  6. Clearly arranged data tables
  7. Reports as MS-Excel- and PDF-files
  8. Statistics
  9. NEW: automatic evaluation of dowel bars inserted on baskets

Users of former version MIT-MagnoProof 5 please contact us for an up-date to use MIT-MagnoProof 6 - please send your enquiry to sales@mit-dresden.de

    To top

    MIT Precision - made in germany

    Standards:

    • ZTV Beton-StB 07
    • ASTM E3013/E3013M-15
    • IRC: 15-2017

    Your contact:

    Technical support
    Matthias Herold
    Phone: +49 (0)351/87181-44
    Send an E-Mail